SHELF
Windows
Can’t open Shared folder W11
- Open Turn Windows Features On or Off
- Enable
SMB 1.0/CIFS ClientandSMB 1.0/CIFS Server - Open
gpedit.mscor Group policies editor - Navigete through
Administrative templates > Network > Lanman Workstation - Make the setting enable insecure guests logons enabled
Other solutions
- Inside
gpedit.mscnavigate throughWindows Settings > Security Settings > Local Policies > Security Options - Locate the policy Microsoft network server: Digitally sign communications (always) and make sure it’s disabled
Custom edge/chrome shortcut
- Open the profile that you want to set a shortcut
- go to the link
edge://version/ - Locate profile path
- make note of the profile number
- Create a shortcut link from the browser application
- open properties and paste this flag in the target area after the directory followed by space
--profile-directory="Profile 1"
Windows can’t sync clock to the internet
- Go to date and time in the
control panel > set time and date -
In internet time tab change settings set the file server:
time.nist.gov - Click in update now
Issues with apps when using router WIFI
- Testing packets
- Open command prompt (cmd)
-
send a ping to any server using the flags
-fand-l <size>ping google.com.br -f -l 1480 :: where 1480 is the value in bytes :: RESPONSE Pinging google.com.br [142.250.79.3] with 1480 bytes of data: Packet needs to be fragmented but DF set. Packet needs to be fragmented but DF set. Packet needs to be fragmented but DF set. Packet needs to be fragmented but DF set. - make this test decreasing the bytes size until the replies return TTL.
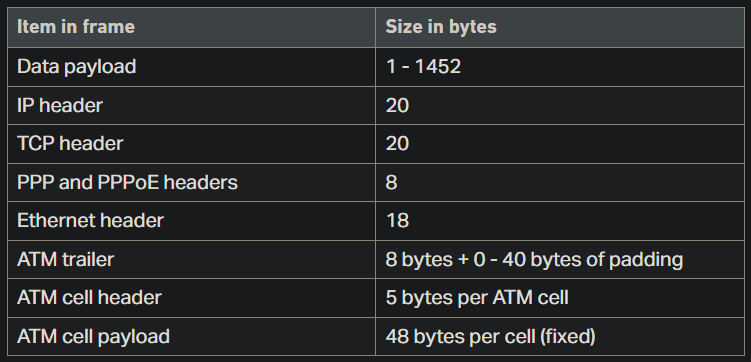
- Take the value found and add +
28 bytesto it (8 from ICMP packets and 20 used by the IP).
- Change the MTU value (maximum transmission unit)
- Access your router admin panel.
- Find the location of MTU configuration - in my case was inside port config.
- Change the value in bytes accordingdly to the result obtained in the test.
::Verify interfaces MTU values
netsh int ipv4 show subinterfaces
::Change the MTU from the interfaces
netsh int ipv4 set subinterface <interface_name> mtu=<new_MTU_size> store=persistent
E.g.
netsh int ipv4 set subinterface "Wi-fi" mtu=1495 store=persistent
netsh int ipv4 set subinterface Wi-fi mtu=1495 store=persistent
Windows shortcuts
- Run WIN + R
shell:system: Windows sytem32 foldershell:common startup: Startup programsshell:common programs: Programs shortcutsshell:control panel folder: Control Panelshell:fonts: Windows font managershell:local appdata: Local app datashell:screenshots: Screenshots folderpowercfg.cpl: Power config plan
Windows 10/11 Blurred apps fix
Method 1: Change Nvidia settings (may solve for all apps)
- In Nvidia Control Panel set
Antialising - FXAAto Off and hit apply. - If the option above didn’t work, you can also try to change the scalling mode to
No Scalinginside Adjust desktop size and position andperform scaling onGPU. (make sure to mark the checkbox Override the scalling mode set by games and programs).
Method 2: Registry method (may solve for all apps)
- Inside Windows Registry Editor navigate to
Computer\HKEY_CURRENT_USER\Control Panel\Desktop. - Look for
Win8DpiScalingand change it’s value to 1. 3.Create aDWORD32named LogPixels (if it doesn’t already exists) and set thevaluetoDECIMAL=120DEFAULTDECIMAL=125.
Method 3: Individual setting for apps
- Right click on the executable file from the application being blurred and go to properties.
- Navigate to tab Compability.
- In the Settings section, choose: Change high DPI settings.
- Check the box Override high DPI scalling behavior.
- Let the scalling be performed by the application.
Autorun file
The name must be autorun.inf
[AutoRun]
icon=exemplo.exe
Windows Activation
(OEM) Original Equipment Manufacturer check
-
Checking
wmic path softwarelicensingservice get OA3xOriginalProductKey -
Activating
SLUI 3
Check and uninstall Windows Product key
-
Checking Product key
slmgr /dlv -
Uninstalling Product key
slmgr /upk
Get full ownership on windows
takeown /F C: /R
issue with hard disk windows in 100%
- Open the command line as administrator
- Execute the following command
Dism /Online /Cleanup-Image /ScanHealth - Wait as long as it takes, untill the process is finished
- Execute the following command
Dism /Online /Cleanup-Image /RestoreHealth - Wait until the process is completed and restart the computer
Temporary folders
%temp%tempprefetchrecent
Shutdown windows
shutdown -s -t time
Obs.: Use
-rinstead of-sto restart
time in seconds
Run the System File Checker tool (SFC.exe)
To do this, follow these steps:
Open an elevated command prompt. To do this, do the following as your appropriate:
If you are running Windows 10, Windows 8.1 or Windows 8, first run the inbox Deployment Image Servicing and Management (DISM) tool prior to running the System File Checker. (If you are running Windows 7 or Windows Vista, skip to Step 3).
Type the following command, and then press Enter. It may take several minutes for the command operation to be completed.
DISM.exe /Online /Cleanup-image /Restorehealth
Important: When you run this command, DISM uses Windows Update to provide the files that are required to fix corruptions. However, if your Windows Update client is already broken, use a running Windows installation as the repair source, or use a Windows side-by-side folder from a network share or from a removable media, such as the Windows DVD, as the source of the files. To do this, run the following command instead:
DISM.exe /Online /Cleanup-Image /RestoreHealth /Source:C:\RepairSource\Windows /LimitAccess
Note: Replace the C:\RepairSource\Windows placeholder with the location of your repair source. For more information about using the DISM tool to repair Windows, reference Repair a Windows Image.
At the command prompt, type the following command, and then press ENTER:
sfc /scannow
How to disable Windows Defender on Windows 10/11
-
Disable real time protection inside
windows update > windows defender firewall -
press WIN + R and type
gpedit.mscthen hit enter or OK -
Go to
Administrative Templates\Windows Components\Microsoft Defender Antivirus -
Double click on Turn off Microsoft Defender Antivirus and hit OK
-
Now inside the current folder, open the folder real time protection and repeat the step 4 but instead, disable turn off real-time protection
HKEY_LOCAL_MACHINE\SOFTWARE\Policies\Microsoft\Windows Defender
create a DWORD 32 bits DisableAntiSpyware value 1 or 0
Enabling Ultimate performance in power mode
Run the following command
powercfg -duplicatescheme e9a42b02-d5df-448d-aa00-03f14749eb61
Missing open/close laptop lid in power options
-
Add lid close action
powercfg -attributes SUB_BUTTONS 5ca83367-6e45-459f-a27b-476b1d01c936 -ATTRIB_HIDE -
Add lid open action
powercfg -attributes SUB_BUTTONS 99ff10e7-23b1-4c07-a9d1-5c3206d741b4 -ATTRIB_HIDE
Otherwise, if you want to remove it you can change the parameter at the end of the code to + ATTRIB_HIDE
How to Change Windows boot logo
- Download this HackerBGRT
- Create an image with 250x250 resolution and BMP format with a full black background color
- The image must be 24-bit format named
boot_image.bpm
- The image must be 24-bit format named
- Execute the
setupfile and pressIto install - A txt file will pop-up, let it open
- Execute paint with administrator priviledges
- Open the
.bmpimage you created - Click
File > Save as > Select A:/EFI/HackBGRT/ - Overwrite the
splash.bmpimage in this folder - Close paint and then the cmd terminal
Restore old right-click context menu in W11
- Right-click the Start button and choose Windows Terminal.
- Copy the command from below, paste it into the Windows Terminal Window, and press Enter.
reg.exe add "HKCU\Software\Classes\CLSID\{86ca1aa0-34aa-4e8b-a509-50c905bae2a2}\InprocServer32" /f /ve
Restart File Explorer or your computer for the changes to take effect. You would see the Legacy Right Click Context menu by default.
If you want to restore the modern context menu just do the following command:
reg.exe delete "HKCU\Software\Classes\CLSID\{86ca1aa0-34aa-4e8b-a509-50c905bae2a2}" /f
| Navigation |
|---|
| 🠝 go top |
| 🠜 go back |